A quick note: This issue is the end of my early free issues of Lovingly Made, and it is packed with arguably some of my most useful culinary knowledge for the home cook. From this week on, there will be 2 free issues and 2 paid issues per month. If you have enjoyed what you have seen here thus far: please consider becoming a paid subscriber today to have access to all issues, all recipes, all the helpful information I can throw at you to be the home cook that you want to be.
There is perpetually a roast chicken in our refrigerator in some form or another. The cycle of the roast chicken is fascinating to me — the uses are so far-reaching that it almost lives an immortal life in the kitchen. Being able to utilize a single ingredient or dish in multiple ways is paying the ultimate respect to its life in this world. (And extra points for sourcing locally and sustainably, of course.)
Michael Ruhlman, a food journalist hero of mine, recently wrote this issue of his Substack:
It reflects on an article that he wrote 25 years ago for Gourmet Magazine on living legend Thomas Keller when he was writing his own cookbook. One of Keller’s own reflections on respecting your food and where it comes from really hit home for me.
Respect all food, and avoid its waste, Keller says, “because it is life itself.”
Although what comes before this is quite graphic in nature, it spoke the truth of what happens to an animal before the meat arrives at a restaurant (or to your kitchen counter) and the need that he felt as a young chef to experience this on his own. It was impactful, to say the least. I’ve read a similar account in Michael Pollan’s book Omnivore’s Dilemma about slaughtering a chicken on a farm in Virginia. The lasting impressions that these experiences have left on people with such influence in the world of food make me say, “Okay. I believe you. I don’t think I need to participate in this for myself.” But it does not turn me away from eating meat whatsoever — it makes me respect it that much more.
So when I roast a chicken, I’m not just roasting a chicken.
Below, I’ll be spelling out the 5 uses that I can personally think of for a roast chicken. None of this is going to be revolutionary, but I’m sharing them here because it is one of my core beliefs that every home cook should know how to roast a chicken. And you’re getting way more than just a roast chicken.
ROASTING
Mainly knowing Ruhlman from a book that I read several years ago (one of my absolute favorites), I decided to look into his extensive anthology for his writing on cooking techniques. I checked out How To Roast from the library to take/compare notes on roasting a chicken, and I’m excited to say that I will eventually own this book — the recipes look spectacular! The introduction alone has stuff spelled out that I had never thought about but had learned over time just from the nature of cooking so many different recipes.
For roasting a chicken, every chef has their preferred methods, it’s a very personal thing. But what stuck out to me with Ruhlman’s instructions is that he has great and very thorough insights, but they also allow you to be flexible in your home kitchen. He recognizes that every oven is different and you really have to know your oven intimately. And he repeats this many times because it honestly can’t be repeated enough. He is a little more professionally-minded when it comes to stuff like trussing and carving — they can be helpful techniques, but they have their time and place (not with a toddler running in circles around the kitchen island and you’re wrist-deep in a chicken butt.) Personally, trussing is like cat’s cradle for me, so I try to avoid situations where I get tangled up in twine. Ultimately, I was glad to read that my instincts to stuff the cavity with lemon and garlic and my longer cooking time were in line with how the general technique of roasting works. If you tie the twine tight enough, the moisture should mostly stay inside the chicken and keep the meat nice and juicy. Yes, it takes a little longer, but maybe that makes an opportunity for you to go and sit down longer. My way of roasting a chicken may be frowned upon by those who are more formally trained, but that’s not me. I say we ultimately all get to the same place: with some delicious roast chicken on our plates 🤷🏻♀️
So what’s my method? It’s basically the same as Ruhlman’s, but I do more in some areas and less in others.
HOW I ROAST A CHICKEN
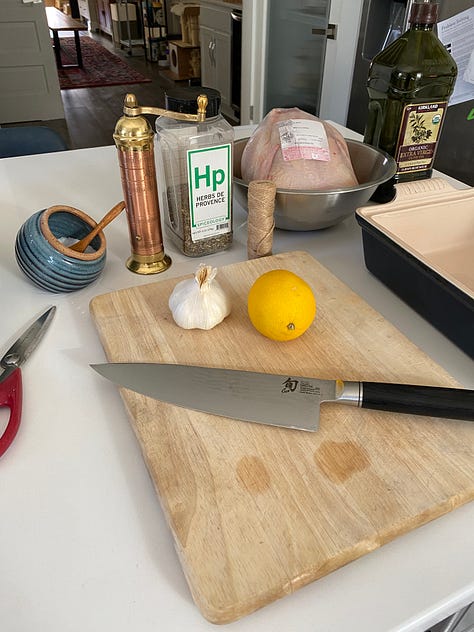
ingredients:
1 whole chicken (I like mine to be 4 ½ -5 ½ pounds)
1 lemon, halved
1 head garlic, halved
up to 2T EVOO
2 tsp each: kosher salt and pepper (combine in small dish)
2T optional herbs and spices + 1T EVOO (combine in small dish)
examples: herbes de provence + lemon zest, zaatar + orange zest, rosemary + lemon zest + minced garlic
tools needed:
9x13 roasting pan (Le Creuset or a Pyrex are what I use)
paper towels
twine
scissors
butter knife and spoon
directions:
preheat your oven to 425F
cut a piece of twine, approx. 12” long
mix salt and pepper and optional herb/spices in 2 separate bowls
prep your chicken, part 1:
remove from packaging and remove any extra parts from cavity (neck, organs, etc), let any extra juices run off into sink, pat dry-ish with paper towels, place in roasting pan (backbone side up); save the neck in the gallon bag (freeze immediately)
prep your chicken, part 2a (if using herb/spice mix):
with your butter knife, find spots at the neck and cavity to slide it in underneath the skin and then loosen with your finger without tearing too much of the skin
use the spoon to place the optional herbs/spices underneath the skin and attempt to spread it out “evenly” underneath the skin
flip chicken over to breast-side-up and repeat the steps above
prep your chicken, part 2b:
oil your chicken, using most on the breast side
season with salt and pepper mixture and rub into the skin to distribute evenly — if any extra s+p, rub inside the cavity
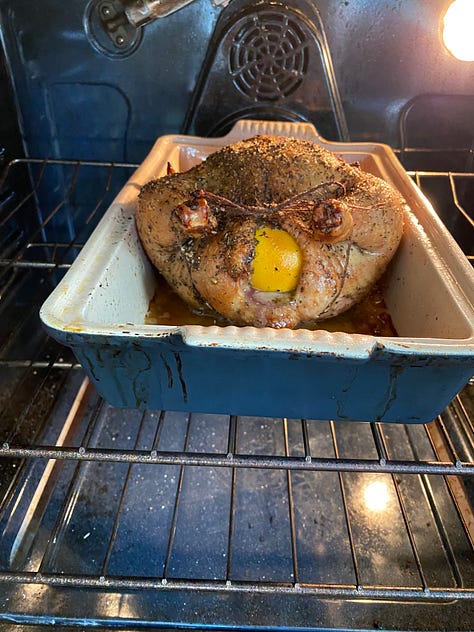
turn the bird breast-side-up and place your lemon and garlic halves inside the cavity (alternating: lemon, garlic, lemon, garlic)
take your twine and place it underneath the tail, with even lengths on either side — bring both sides up and around the ends of the drumsticks and tie in a bow to close off the cavity
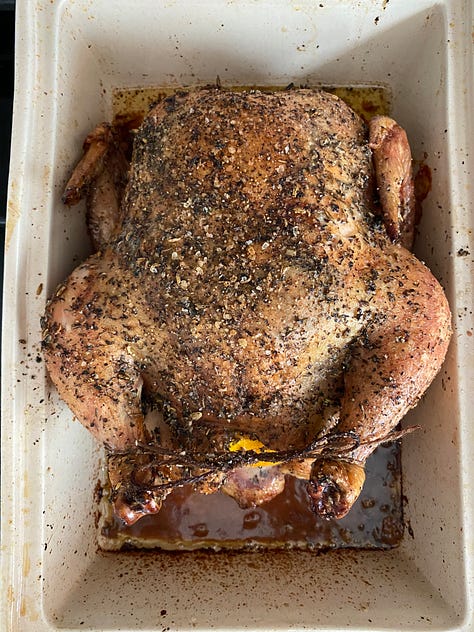
after washing your hands thoroughly, place the chicken in the oven for ~18 minutes per pound of bird (ex: 5 pound chicken cooks for 90 minutes), or until the temperature of the breast reaches 165F.
please adjust this timing, and I cannot stress this enough, because everyone’s oven is different. I like to check it a little early since my oven runs hot apparently — from my most recent roast chicken experience, that 5.4 pound bird was done in 90 minutes (aka 16 min 40 sec per pound 🤷🏻♀️)
let rest up to 20 minutes before carving, if eating immediately.
(if saving a whole roast chicken to shred later: let rest 30-40 minutes, cover with foil, and the place entire roasting pan on a trivet in your refrigerator.)


PHASE 1: EAT
There are countless ways that you can eat a roast chicken, especially if you are shredding the meat, but I will get to that later. What I’m talking about here is how you eat a roast chicken the night that you make it.
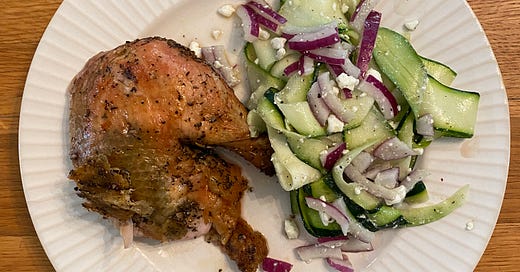
Because we are only a family of three, I like to serve the legs (thigh and drumstick) to the adults and up to half of a breast to our toddler. Then I fill the other half of the plates with vegetables and sometimes a smaller side of a grain/starch, both of which are easy to prepare while the bird roasts.
Leaving some meat on the chicken also helps make cleaning up easy — you just leave the remaining roast chicken in the roasting pan, cover with foil, and she’ll be waiting for you in the fridge until you’re ready to shred 🎸🐓🔪


PHASE 2: SKIN
I can hear it now: “Shouldn’t I avoid eating the skin? Isn’t eating straight-up fat bad for you?” Although hard to do because it’s so damn delicious, eating chicken skin in moderation has some health benefits that you may not have thought of at first.
Collagen (for healthy, glowing skin and nice lubricated joints), protein (because we can all use more protein sources in our lives), and unsaturated fats (good for your heart) are coming to rescue you from your doubts. But to state the obvious, roasted chicken skin is much better for you than fried due to the lack of seed oils used in roasting — save the heavy chicken skin consumption for your roast chicken nights.
So make sure to use those skins for a little protein and collagen boost in your diet! Eat it right off the freshly cooked legs, and save the crispiest skin from the breasts if not using right away for a quick revival in the oven. The skin on the backside, however, will be a little gluey from roasting. Remove carefully and try to avoid tearing too much before storing the remaining bird and follow the directions below to make some quick chicken skin crisps. Eat for a fun treat or crumble on top of some roasted vegetables or cooked rice.
To make crispy chicken skin chips:
set your oven to a low broil
cut chicken skin into 2” strips or chunks
place chicken skin on a baking sheet lined with parchment paper or silicone baking mat
place baking sheet on rack somewhere in upper half of your oven (sometimes low broil can mean high broil, so place your rack lower if your oven is an overachiever)
monitor the chicken skins every 2 minutes, making sure the edges aren’t turning black
once the skin has become *crisp* to your liking, remove and let cool 5 minutes
no seasoning necessary (unless you roasted a very plain bird)
PHASE 3: SHRED
For shredding the meat:
for using meat from the whole bird, after roasting, let it cool for 30 minutes at room temperature, cover with foil, and place on a trivet or dishcloth in the fridge overnight
after the overnight stay in the fridge, place the whole chicken on a cutting board and make a couple of cuts along the breastbone, without removing the meat yet
with your hands, remove the meat from just about anywhere you can find it and place it on a large cutting board to chop to your desired consistency with a cleaver/heavy duty knife. (pull the legs and wings out from the joints by twisting until they pop off)
Now this is where things get exciting, especially if you’ve saved the whole chicken. Shredded chicken is so so versatile — add it to pasta, soups, salads, enchiladas, tacos, burritos, etc. The possibilities are endless. Even if you’ve saved what was left after your beautiful roast chicken dinner a couple of nights ago, you likely have plenty to work with for something like a delicious chicken salad.
Chicken salad is an absolute staple in this house. It’s very flexible with the types of vegetables that you bulk it up with, letting you work with the seasons. Honestly, I should probably write an issue of this newsletter dedicated to all of my chicken salad variations — carrots and radishes in the spring, fennel in the summer, peppers and celery in late summer, celery and carrots in the fall, etc. You get to experience different versions of sweetness, bitterness, and crunchiness throughout the year. I find that this helps keep a staple recipe fresh and exciting for the mind and the tastebuds. Your gut also appreciates the variety of prebiotics (food for your gut microbiome) 😋
It is also surprisingly easy to modify for young eaters — it was one of my son’s favorite early foods. You just chop the ever-living shit out of everything until they get their molars and are chewing/mashing things with the backs of their mouths. (Again, I am not an infant feeding therapist, but my son had one and she taught me everything I know — check out her instagram or website)
MY MOST RECENT CHICKEN SALAD
(eyeballed measurements because my toddler helped)
3 cups shredded chicken
1 cup finely chopped/diced celery
1 cup finely chopped/diced sweet Italian red pepper (Jimmy Nardello)
1 ½ T dijon mustard
½ cup Icelandic skyr (or Greek yogurt)
¼ cup mayonnaise (I like the kind made with avocado oil)
1T dried dill
1T dried parsley
salt + pepper, to taste
For the dead of winter, or times that I can’t make it to the farmers market, I like to have a few vegetables that I can rely on at the grocery store. My year-round version of chicken salad depends on three vegetables: carrots, celery, and thinly sliced green onions. You can’t go wrong with these three. I also like to add a couple tablespoons of sauerkraut for extra tang and a probiotic punch. Make your chicken salad do all of your nutritional heavy-lifting — in the name of convenience.
PHASE 4: COLLECT EXTRAS
Now, after you’ve shredded the chicken and have all this leftover “junk” sitting in the roasting pan, what do you do? You collect and save that junk for more tasty creations.
Scoop the fat and drippings out of the pan and place into a small saucepan. Heat it through until warm and homogenous. Strain this through a fine-mesh sieve and transfer to a glass jar for a later use. I call these my chicken drippings. There will be two layers to this, the flavorful drippings and the fat. The fat will rise to the top and create a protective layer, letting you keep this gelatinized gold in your fridge for quite some time. But I like to either freeze or use it up pretty quickly because it makes certain elements of dinner time that much easier, as you’ll read below.
And, of course, please PLEASE save that chicken carcass. Once everything has been picked off the chicken, get your reusable gallon ziploc bag (the one with the chicken neck in it), and put the remaining carcass and other bones in. Store it in the freezer. Wait for the broth phase.
What to do with the chicken drippings:
reheat and drizzle small amounts…
over extra meat when making chicken salad
over cooked vegetables
use as fat source for roasting vegetables
make gravy (reheat and add flour 1T at a time until you’ve reached a thick, but not gluey consistency)
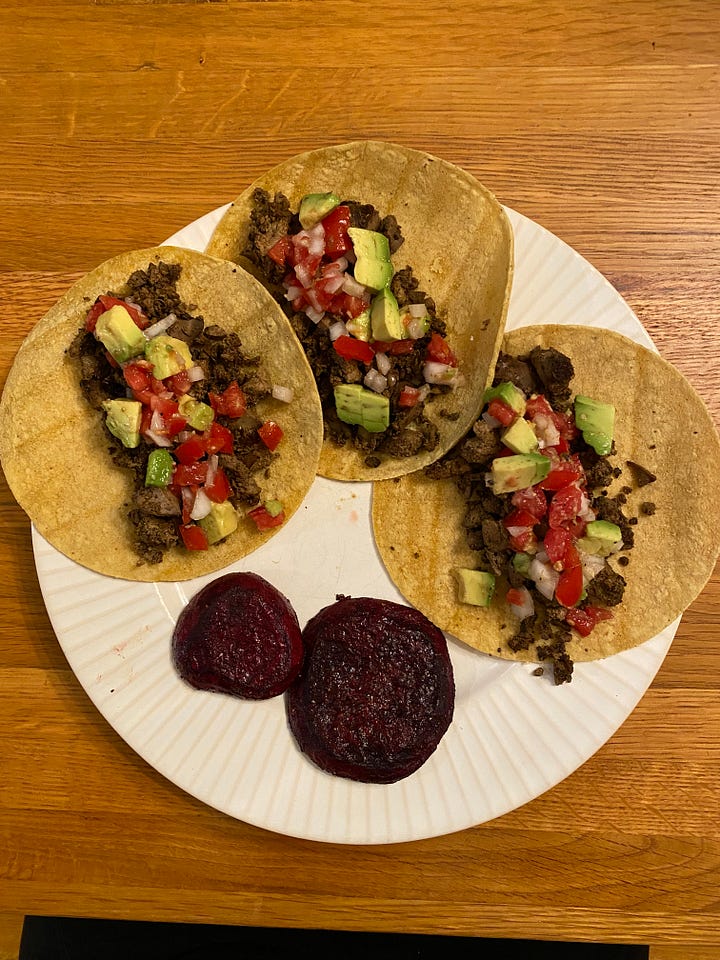
CHICKEN DRIPPING ROASTED BEETS
ingredients
1 ½ pounds beets
1/4 cup chicken drippings, warmed/melted
1 tsp smoked paprika
1/2 tsp garlic powder
salt + pepper, to taste
directions
preheat your oven to 400F
peel your beets and slice into ½” rounds
in a mixing bowl, toss your beets with chicken drippings, spices, salt + pepper
line a baking sheet with parchment paper or a silicone baking mat, and place the beet rounds in an even layer on the baking sheet
cook for 20 minutes, or until beets are fork-tender

PHASE 5: BROTH
Finally, we get to my favorite phase - the broth phase. That gallon ziploc bag with the carcass in it? This is your moneymaker. Add vegetable scraps to it as you make other delicious creations in your kitchen, pretty much anything outside of the cruciferous family will work. (Cruciferous vegetables include broccoli, cabbage, cauliflower, brussels sprouts, collards — anything with a little funk to it.) My favorites are carrot peelings, onion skins and ends, garlic skins, celery leaves and odds/ends, pepper cores, kale stems, mushroom stems, those annoyingly small ginger knobs, etc. This way you don’t have to worry about buying produce just to make your broth, and you get a more full-bodied chicken broth. Stuff the gallon bag until it’s full, then it’s broth time.
Making broth from your saved chicken carcass is seriously one of the most economical things you can do. Like shredded meat, you can take your chicken broth in so many directions: use it for soups and stews, cook rice and other grains, add it to a roux, drink it when you are under the weather, etc etc etc
To make chicken broth:
in a large stockpot, preferably one with a deep built-in strainer like this one, fit as many chicken bones and vegetable scraps as you can, up to about 3” below the top of the stockpot
the larger the stockpot, the more carcasses etc
fill the stockpot with water, making sure to cover all the carcasses etc
bring to a boil over high heat then lower to an active simmer for less cooking time or to an occasional bubble for a longer cooking time
active simmer: keep on low heat, uncovered, up to 4 hours, adding water to keep everything submerged
occasional bubble: keep on lowest heat, covered, for up to 24 hours — this is more of a bone broth, if you’re into that
if you are needing to reduce the volume for storage considerations, remove the carcass etc and bring the heat up to high and boil the liquid down about halfway
this is a great winter activity to humidify your house
let the broth cool for 1 hour (you must refrigerate within 2 hours to avoid bacteria growth) and strain into a large pot or heat proof measuring cup with a fine-mesh sieve or colander lined with cheesecloth
store in wide mouth glass mason jars with no “shoulders” in the refrigerator for up to 3 days or freeze to keep longer
if your instinct for freezing stuff in glass jars is a “hell no”, that’s fine, and for you I highly recommend Souper Cubes — once frozen, you can pop each block out to thaw or continue to store in a gallon ziploc bag
I’m going to say carcass one more time. Carcass.
And that’s the life cycle of a roast chicken in my house. The presence of a roast chicken exists in almost all five phases at once — the one lacking phase is the skin, as I don’t always have the time/presence of mind to make those delightful chicken skin crisps. My hope with this quite lengthy issue dedicated to spreading the beauty that a roast chicken can bring to your table, your fridge, your freezer is that you are now inspired to make the roast chicken a part of your kitchen routines.
From the bottom of my heart, thank you for being here.
❤️ Sarah



I make stock all the time w/just the chicken carcass - no veg because I can add those later and find that sometimes the stock is too vegetal for me. I also put the stockpot in a 200' oven overnight - no monitoring and it's always perfect - no worry about it boiling and emulsifying the fat into the broth. And the house smells terrific in the AM.
Mario Venzago, the Indianapolis Symphony’s wonderful past Music Director, new well the value of a roast chicken. At the beginning of a week he would often tell Blake he was going home to make a chicken.
A single person or couples can really cover a good portion of the week with one bird. That’s a different story when you have a teenage soccer player in the house who devours any available protein source after practices and games. I did get to make broth though!